Exterior painting prep guide
How to Prepare Your House for Exterior Painting
To prepare your house for exterior painting, clear access around the walls, wash away dirt and chalk, let surfaces dry, scrape loose paint, complete repairs, caulk failed joints, prime bare areas, and protect everything that should not be painted. The short version: clean, sound, dry, and protected.
Quick answer
Exterior paint lasts when the surface underneath is ready.
Paint is the visible part of the job. Preparation is the part that decides whether it still looks good years later. New coating needs a surface that is clean, stable, dry, repaired, and properly primed.
Here is the thing: pressure washing is not the whole prep process. It is one step. If loose paint, failed caulk, rotten trim, glossy edges, or bare material remain underneath, premium paint cannot rescue the shortcut.
Austin homeowners can help the project move smoothly by clearing access and sharing property details. The painter should handle the technical surface prep and explain it clearly in the estimate.
Before the crew arrives
What homeowners should do before exterior painting starts.
You should not be expected to scrape siding or climb a ladder. Your job is simpler: make the work area accessible, protect the things only you know about, and remove avoidable obstacles.
- Move patio furniture, grills, toys, planters, and decorations away from the walls.
- Trim shrubs and tree branches so painters can safely reach siding, fascia, and trim.
- Close windows and doors before washing or spraying begins.
- Remove fragile wall hangings from exterior-facing interior walls.
- Unlock gates and confirm where the crew can access water and electricity.
- Point out sprinkler controls, pets, alarm sensors, cameras, and delicate landscaping.
- Park vehicles away from the work area and keep driveways clear when lifts or ladders are needed.
- Choose colors before the scheduled start so the project does not stall.
If moving heavy items or trimming plants is difficult, mention it during the estimate. Clear expectations beat a surprise on painting day.
Professional preparation
Eight steps that create a paint-ready exterior.
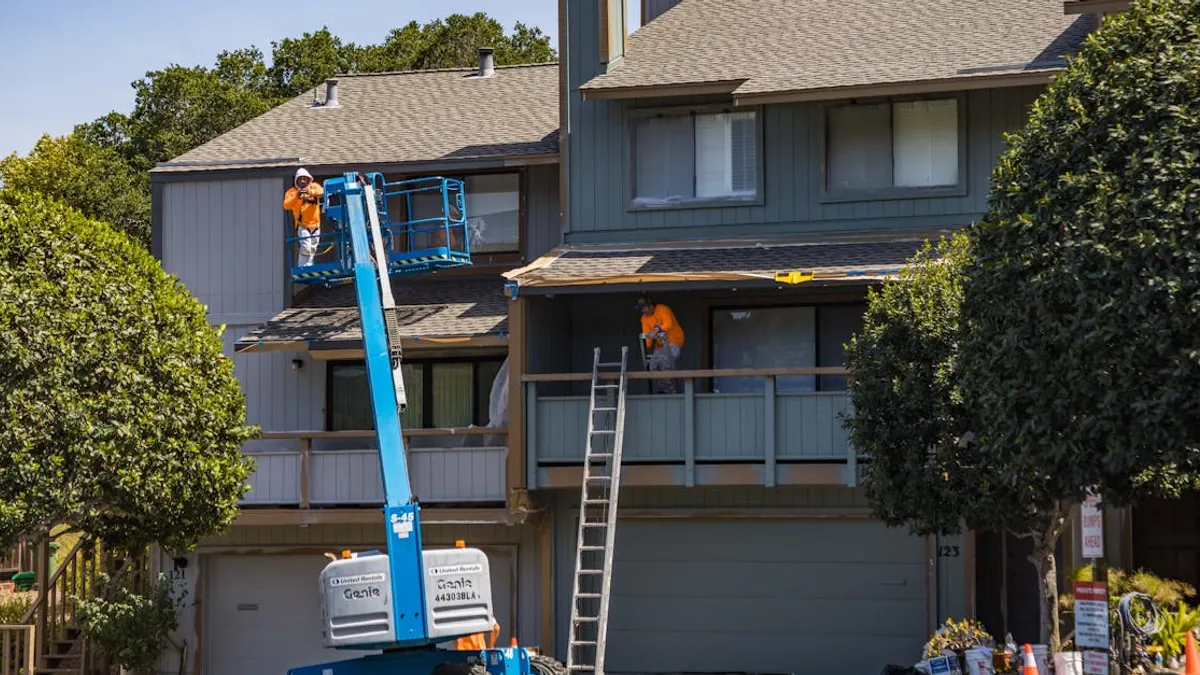
Every house is different, so not every project needs the same amount of work. These are the core steps a painter should evaluate and include when the condition calls for them.
Inspect every surface
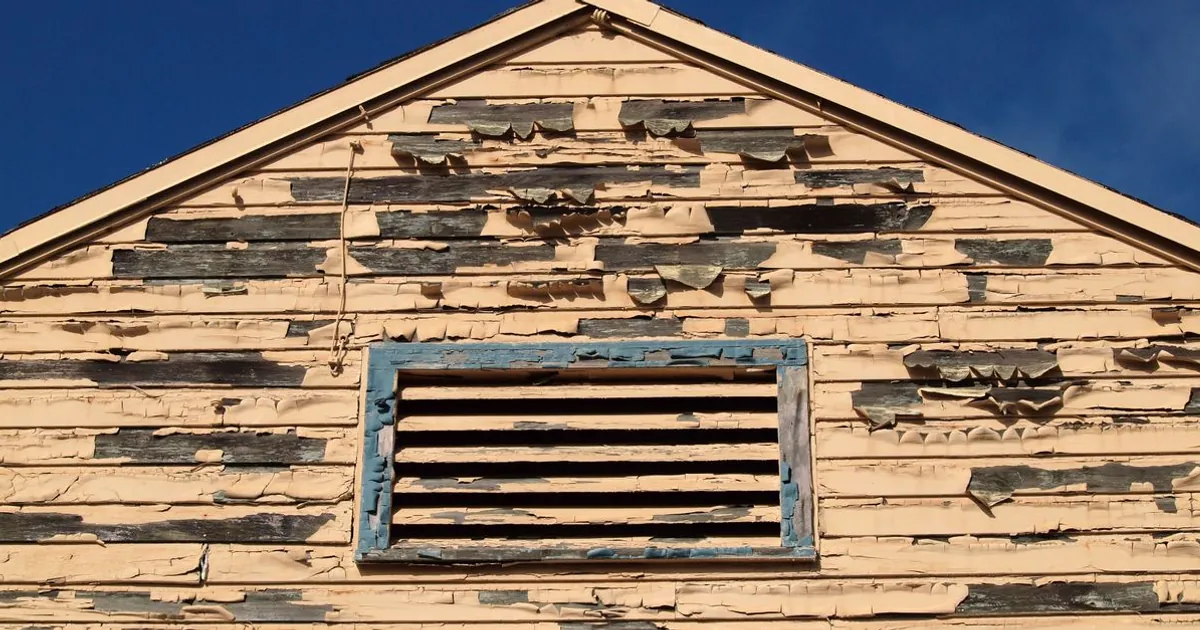
Walk the full exterior and look for peeling paint, chalking, cracks, soft wood, failed caulk, mildew, rust, and water stains. Good prep starts with knowing what is actually failing.
Wash away dirt and chalk
Dust, pollen, mildew, cobwebs, and powdery old paint keep new coatings from bonding. Washing creates a clean starting point, but it is only the beginning.
Let the exterior dry
Paint and primer should not trap moisture. Dry time depends on shade, humidity, surface material, and weather, so a rushed next-day coating is not always the smart move.
Scrape and sand loose paint
Anything loose has to go. Scraping removes failed coating, while sanding softens rough edges so the repaired area does not look like a patch under fresh paint.
Repair damaged material
Rotten trim, split siding, open stucco cracks, rust, and loose fasteners need attention before coating. Paint can protect sound material. It cannot turn damage into healthy wood.
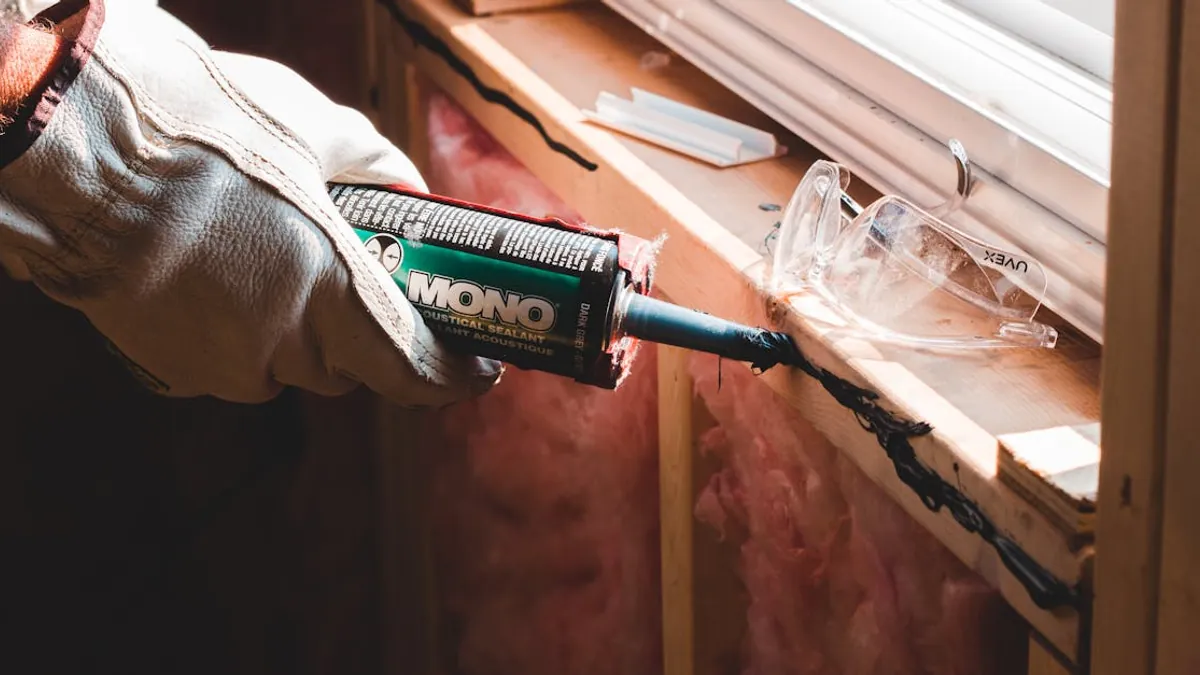
Caulk the right gaps
Failed joints around trim, doors, windows, and penetrations should be sealed with an exterior-grade product. Drainage openings and places designed to breathe should not be blindly filled.
Prime bare and problem areas
Bare wood, patched sections, stains, rust-treated metal, and difficult surfaces may need targeted primer. Primer is part of the coating system, not an optional sales upgrade.
Mask and protect
Windows, fixtures, roofs, walkways, plants, hardware, and nearby surfaces need protection. Clean masking is how a fast project avoids becoming an expensive cleanup project.
Washing and dry time
Wash carefully, then give moisture somewhere to go.
Exterior washing removes dirt, pollen, mildew, cobwebs, and chalky residue. The goal is a clean surface, not forcing water behind siding, into vents, or around windows with maximum pressure.
Many exteriors need at least 24 to 48 hours of suitable drying weather. Porous stucco, shaded wood, humid conditions, or water that reaches joints can require longer. A moisture meter can help when conditions are questionable.
Painting damp material is a classic shortcut. It can trap moisture beneath the coating and lead to blistering or peeling later. That sounds great for nobody except the person selling you the next paint job.
Repairs, caulk, and primer
Fix the weak spots before covering them.
Repairs
Replace or stabilize damaged trim, siding, fasteners, masonry, and rusted areas before coating.
Caulk
Seal failed joints where water can enter, while leaving intentional drainage and ventilation paths open.
Primer
Prime bare, patched, stained, porous, or problem surfaces with a product matched to the material.
Prep matters more than the logo on the paint can. A premium coating applied over rotten wood or loose paint is still sitting on a bad foundation.
If your home was built before 1978, disturbing old paint may require lead-safe practices. The EPA Renovation, Repair and Painting Program explains federal requirements for contractors working around lead-based paint.
Austin painting weather
Prepare the schedule for Texas weather too.
Austin exterior painting is not just about whether rain appears in the forecast. Surface temperature, direct sun, wind, humidity, overnight conditions, and the product's recoat window all matter.
In hot weather, experienced crews may start earlier and follow the shade around the home. A wall can be much hotter than the air temperature. Applying paint outside the manufacturer's range can affect flow, adhesion, and curing.
Our guide to the best time to paint a house exterior in Austin explains seasonal scheduling in more detail.
Dry surface
No trapped wash water, rain, or heavy overnight moisture.
Safe temperature
Air and surface temperatures fit the coating instructions.
Clean forecast
Enough suitable time for application and curing after each coat.
Common mistakes
Exterior prep shortcuts that come back to collect.
Treating pressure washing as complete prep
Washing removes grime. It does not scrape loose paint, repair cracks, replace failed caulk, sand rough edges, or prime bare material.
Painting before the house is dry
Moisture trapped beneath paint can cause blistering, peeling, and poor adhesion. Dry on the surface does not always mean dry inside porous siding or stucco.
Caulking everything in sight
Some gaps are drainage or ventilation paths. Sealing the wrong opening can trap water. Exterior caulking needs judgment, not enthusiasm.
Skipping primer on bare areas
Finish paint alone may flash, absorb unevenly, or fail early on exposed wood and repairs. Spot primer helps create a stable, consistent surface.
Ignoring the weather forecast
Hot siding, rain, heavy humidity, and cold overnight temperatures affect application and curing. The forecast matters beyond the moment the brush touches the wall.
Choosing the cheapest prep scope
A low estimate can look great until you realize scraping, repairs, caulk, primer, or protection were barely included. Cheap prep is expensive when the paint fails.
If you are comparing estimates, look beyond the total. Ask what washing, scraping, sanding, repairs, caulk, primer, masking, cleanup, and final walkthrough are actually included. Our guide on how to choose a painting contractor in Austin has a complete quote-comparison checklist.
Helpful resources
Exterior preparation resources worth keeping.
Free Austin estimate
Want an exterior prep plan that fits your home?
Tell us about your siding, trim, problem areas, access, and timeline. New Life Painting will inspect the exterior and explain the washing, repairs, caulk, primer, coating system, and schedule before you commit.
FAQ
Exterior house preparation questions.
What should I do before exterior painters arrive?
Move furniture, grills, planters, toys, and decorations away from the house. Trim back plants, close windows, unlock gates, secure pets, clear vehicles, and tell the crew about sprinklers, cameras, alarms, or fragile landscaping.
Should a house be pressure washed before exterior painting?
Most homes should be washed before painting to remove dirt, mildew, pollen, cobwebs, and chalky residue. Pressure washing alone is not full prep; scraping, sanding, repairs, caulking, primer, and dry time may still be needed.
How long should a house dry after pressure washing before painting?
Many surfaces need at least 24 to 48 hours of suitable drying weather, but shaded wood, stucco, humidity, and cooler conditions can require longer. A painter should evaluate the surface instead of relying only on the clock.
Does all old exterior paint need to be removed?
No. Sound, well-bonded paint can usually remain after cleaning and proper preparation. Loose, peeling, bubbling, or poorly bonded paint should be removed until the remaining edge is stable.
Do I need primer before painting a house exterior?
Not every previously painted surface needs a full coat of primer. Bare wood, repairs, stains, rust-treated metal, porous masonry, and major color or coating changes may need spot primer or a specific primer system.
Can exterior painting happen during Austin summer?
Yes, but surface temperature and direct sun matter. Painters may work around the house to follow shade, adjust timing, and avoid applying coatings to surfaces that are hotter than the product allows.
How much of the exterior painting cost is preparation?
Prep can be a substantial part of the labor, especially when a home has peeling paint, damaged trim, cracked caulk, difficult access, or extensive masking. That is why two similar-size homes can receive very different estimates.
Related guides and services